
Field guide
AI Video Artifacts: Diagnose Flicker, Drift, and Distortion
Identify flicker, identity drift, and structural errors in AI-generated video. Use symptom-specific checks and focused experiments before another paid attempt.
Identify the artifact before paying for another attempt
AI video artifacts need different checks. Flicker is a rapid unwanted change in brightness or detail. Drift is a change that accumulates, such as a face or object gradually becoming different. Distortion is a structural error: a bent doorway, merged fingers, or an extra limb. A single clip can contain more than one. For a portrait teaser, that might mean a collar changing shape while the light pulses; for a product shot, it might be a handle merging into the body.
This distinction has a research basis. VBench evaluates generated video across separate dimensions including temporal flickering, subject consistency, and motion smoothness. Use the same habit here: name the symptom, locate it in the clip, and choose one change to test.
First separate generation from playback and export
Keep the original downloaded video. Compare it with the preview and with any edited or social-media copy at the same timestamp. If a problem appears only after an export or upload, investigate that stage before spending Credits on a new generation.
This guide concerns changes visible in the generated scene. Blocky edges introduced by a later encode, a player that drops frames, and a model that invents a third hand are different problems. Play the original in a second player and compare the same moment before choosing a generation or export fix.
Match the symptom to a first check
Scroll sideways to compare all columns →
| Symptom in the original | Inspect | One focused experiment |
|---|---|---|
| Light pulses across an otherwise steady scene | Whether pulsing light, lightning, or flickering lamps were requested | Replace that lighting description with a steady source |
| Fabric or background texture shimmers | Whether it is already unclear in the input image and when the change begins | Try a clearer source while keeping the motion prompt |
| A face, costume, or object gradually changes | The last consistent frame and the action immediately after it | Compare a version with a smaller turn or a less revealing camera move |
| An extra limb or merged object appears | The point of contact, occlusion, or direction change | Separate that interaction into a simpler shot |
| The frame slides or zooms despite a fixed-camera request | Stable background landmarks | Follow the camera movement checks |
Each row gives you a focused experiment. Keep the original so you can see whether the change helped.
When foreground effects hide a face
In this archived fashion-scene draft, ribbons and metallic fragments pass across the character. Between 5.25 and 6.5 seconds, they overlap her face and torso; around six seconds, facial detail becomes difficult to read and looks distorted among the foreground effects.
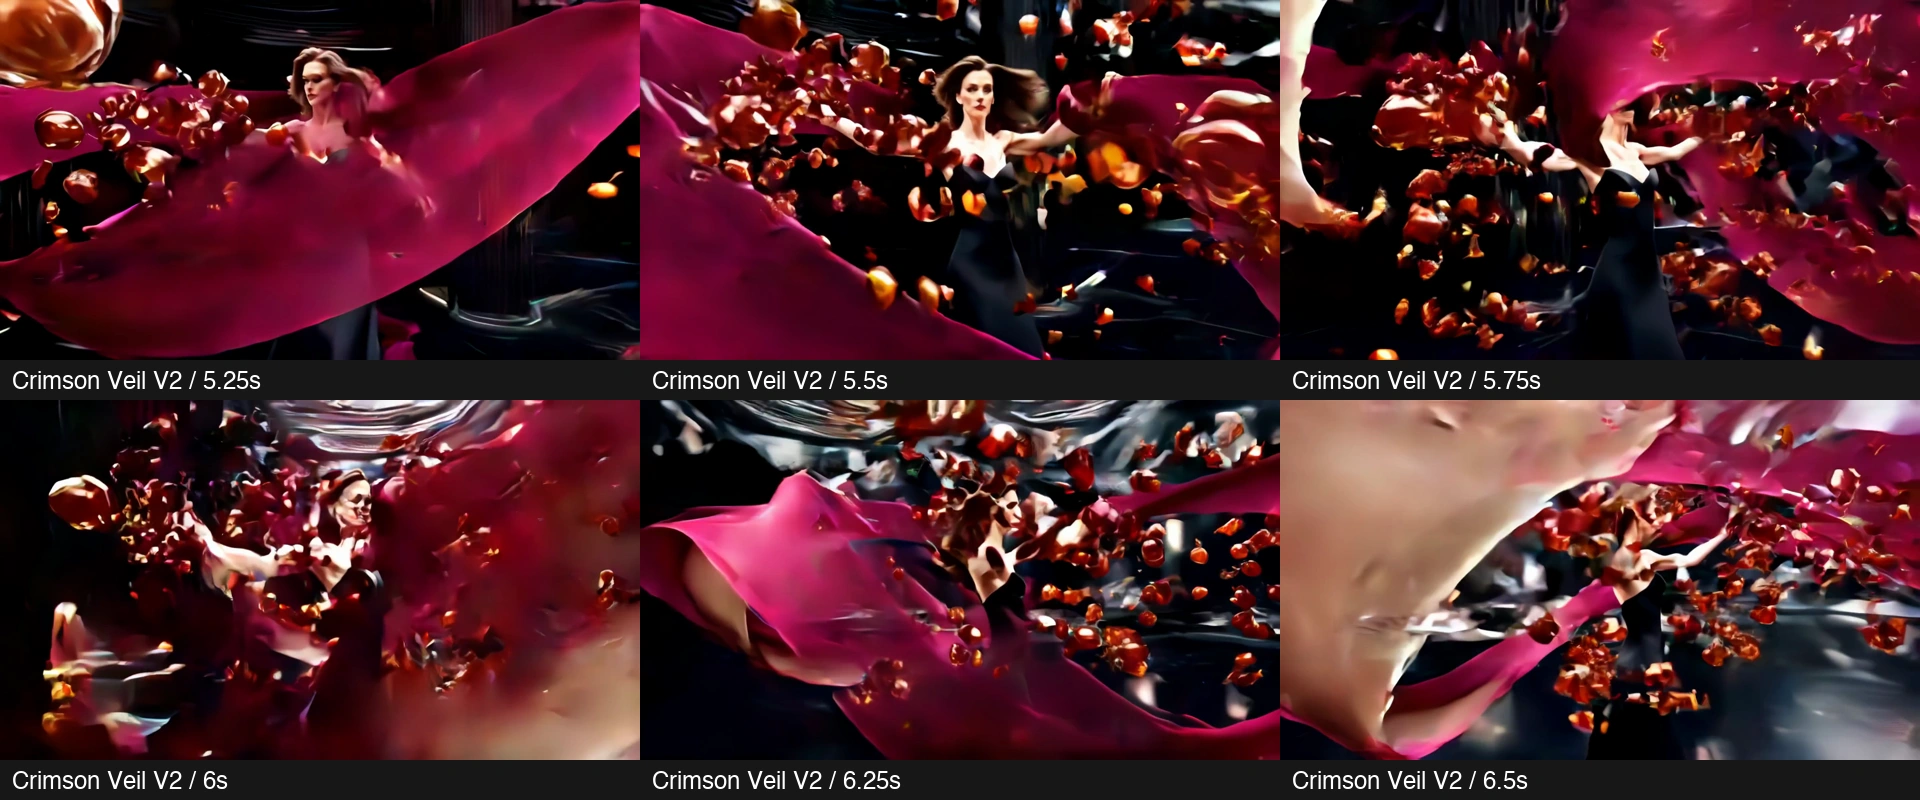
First separate occlusion—something covering the face—from changes to the face itself. Find a clear view before the passage and another after it. For a portrait where recognition matters, a useful next test would move the ribbon behind the subject or remove the foreground fragments. That changes the shot design; the illustrated draft does not include a tested repair.
Example details
Historical LTX 2.5 text-to-video generation, August 27, 2026: recorded input of 12 seconds, 1080p, 16:9, and seed 318548787. The adult character and setting were generated from text. The full prompt and record preserve the provider-returned input. The displayed video is resized and has its audio removed; the original contains an audio track.
The close frame sheet samples 5.25, 5.5, 5.75, 6, 6.25, and 6.5 seconds. It shows an obscured, difficult-to-read face, rather than establishing identity drift or temporal flicker. View changes, light, and overlapping effects all complicate that judgment.
If the subject simply leaves the frame, begin with the camera and framing checks. Our horse example illustrates that separate problem.
Flicker: inspect light and texture separately
Watch the clip at normal speed first. Does the entire scene brighten and darken, or does only a patterned surface shimmer? Then pause around the first visible change. A flickering sign can be intentional while changing facial texture is not.
For global pulsing, read the lighting instruction literally. A draft asking for “flickering projector light” already requests changing illumination. If you need steady light, make that change before altering the action or camera. Record whether the unwanted pulse remains.
For local texture changes in image-to-video, inspect the same area in the source. Runway's image-to-video guide warns that source artifacts, including blurry faces or hands, can become more pronounced in video. That guidance is for Gen-4.5. Use the image preparation guide to inspect the source before trying a clearer version in Image to Video.
Drift: find the point where continuity breaks
Choose details you can actually compare: a boat's folded tip, a jacket's collar, or the position of a door. Note the first time one changes. A note such as “the collar becomes a scarf after the subject turns at 00:03” gives you a specific moment to compare.
Look at the event just before the change. Did the subject turn away, leave the frame, pass behind something, or reveal an unseen side? You can test a smaller turn or a shot that keeps the detail visible. This narrows the creative task, but it may also remove movement you wanted. Evaluate both continuity and whether the revised shot still serves the brief.
For faces and clothing, use the character consistency guide. For camera drift, check the background rather than adding more facial description.
Distortion: inspect the interaction, not just the prompt length
Simple prompts can still produce structural errors. In a Reddit report about Runway, a user described asking a person to pick up popcorn and receiving an extra arm. The post is an individual report of a hand-object interaction going wrong. It gives you a concrete place to look: which hand moves, and what happens when it touches the object?
If your error occurs during contact, write down the participating objects and the intended relationship. For instance, “the right hand lifts the cup while the left hand rests on the table” is a testable direction. Compare it with a version that begins after the lift, if that still tells the story. Starting after the lift avoids that interaction, so choose it only if the shortened action still works for your scene.
If the output misrepresents an important product detail or visible text, reject that result for uses requiring accuracy. A plausible-looking substitute is still a mismatch.
Keep a diagnostic record and a stopping rule
For each attempt, save the prompt, source, model and settings, displayed cost, original video, symptom timestamp, and the one change you made next. If your settings offer a seed, record it too. Our editorial method explains how we document examples and their limits.
Review the whole clip after a change. Keep a take only when both the important details and the intended action work for your brief.
Set the number of attempts you are willing to spend before resubmitting. When the same important defect persists, choose between a different shot, a different source, an available alternative configuration, or conventional editing. Use the Credits guide to set your retry budget. When you have identified a specific prompt change, test it in Text to Video; when the source needs changing, use Image to Video.
Use the method